
Create your character, step by step
By the OFMAI Team · Updated October 2026
Creating a character from scratch is six screens and three charges: 6 credits for the two face proposals on the Pick screen, 6 for the front and back body shots, and 38 when you press Confirm my character — 50 credits in all, plus about fifteen minutes of training you do not have to sit through. Everything below walks those screens in order, with the labels you will actually read and the figure printed on each button.
There is no single create button that runs the whole thing and bills you once, and every step you repeat is billed again: a second batch of faces is another 6 credits, a re-rolled back view 3. That is the whole difference between a 50-credit character and a 90-credit one with nothing extra to show for it.
The six steps, and which of them are optional
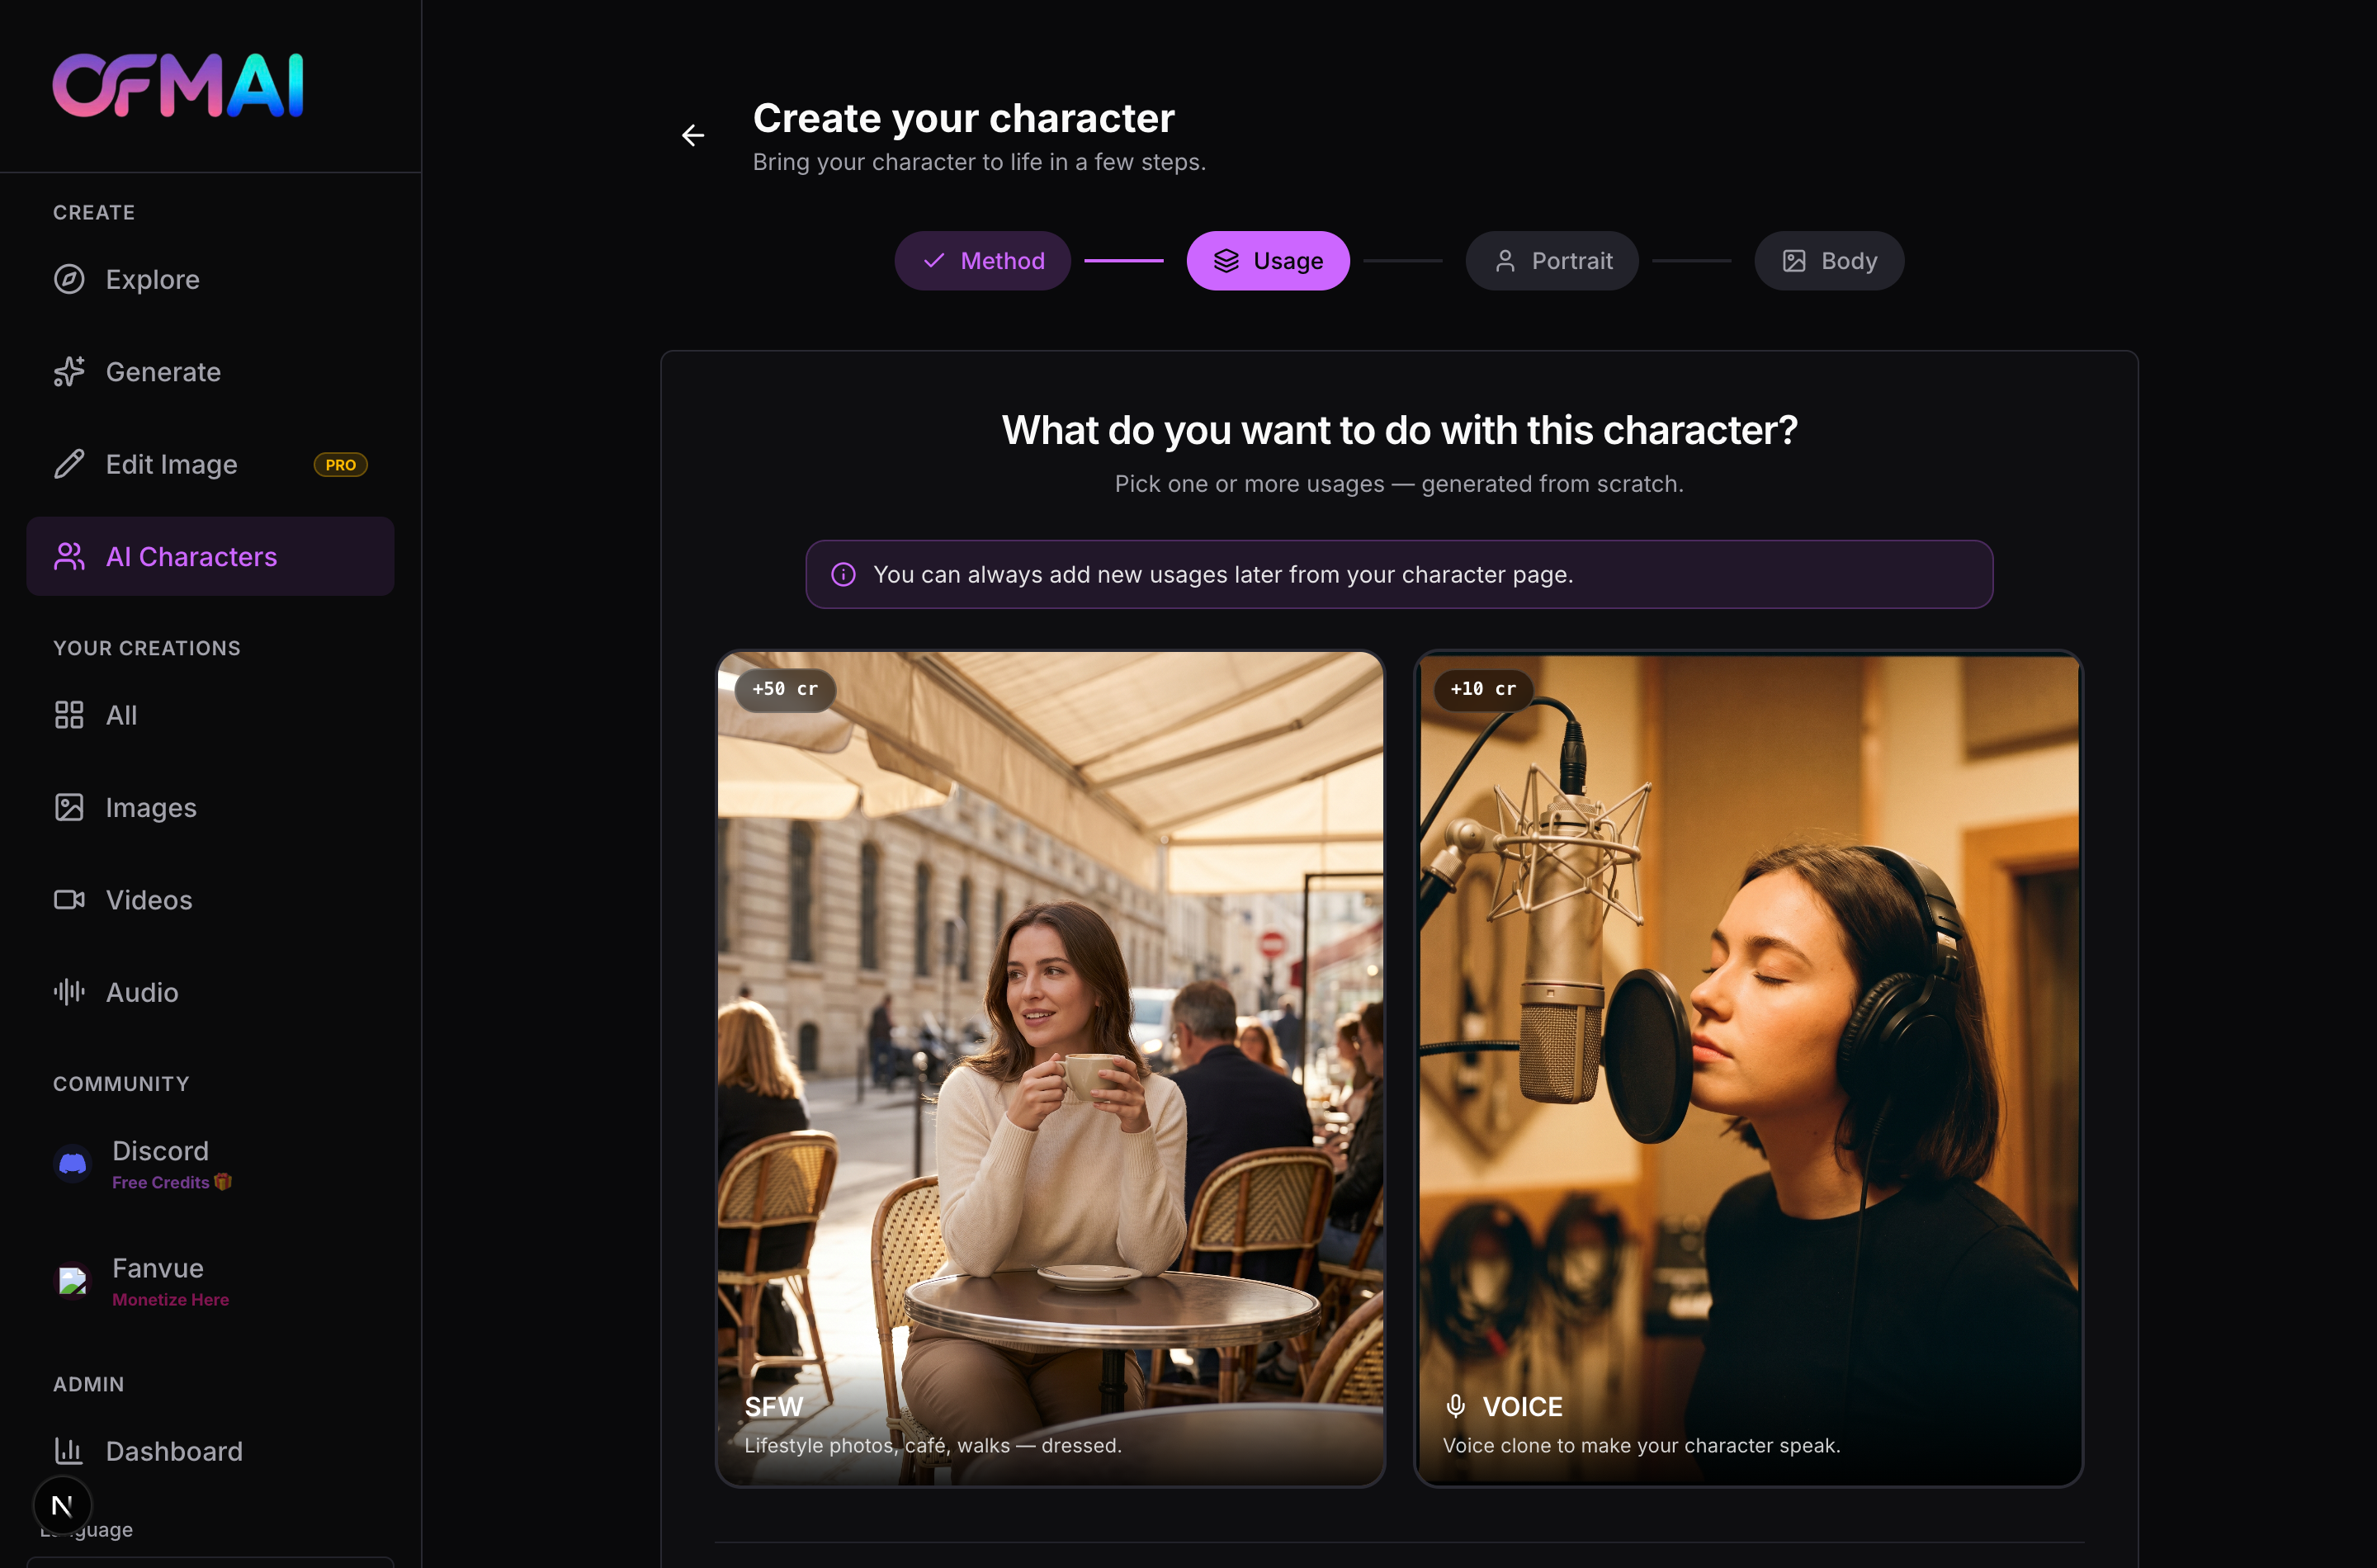
The progress bar at the top of the builder shows your route, not a fixed list. It reads Method, then Usage, then a tail that depends on what you chose. Pick the from-scratch route and the tail is Portrait, then Body. Pick the upload route and the tail is Photos, then Pick. If you ticked the voice option back at Usage, a Voice step is appended to the end; if you did not, the builder finishes without it.
That is worth stating plainly because it is easy to assume a step is missing. There is no separate confirmation screen at the end — the confirm action lives on the last step of your route, and pressing it is what creates the character and starts training. Likewise the Pick screen, where you choose between two generated faces, is folded into the Portrait entry of the progress bar rather than shown as its own segment. You will see the Pick screen; you will not see it counted separately in the bar.
Your progress is saved server-side as you move. If you close the tab at the Body step, the character draft is waiting on your characters page when you come back, with the traits you had chosen and the images you had already generated. Drafts are kept for 30 days.
Step 1 — Method: how the character comes into existence
The first screen asks "How do you want to create your character?" and offers two cards. The left card, "I already have my character", is for people bringing an existing set of photos. The right card, "Create from scratch", carries a Recommended badge and describes sculpting the character trait by trait, with the promise of two proposals to pick from and no photos needed.
This choice sets the whole rest of the funnel, and going back to change it means starting the tail over. Choose from scratch if you are inventing someone. Choose upload only if you genuinely have ten or more usable photos of one consistent subject already on your drive — the next lesson goes into exactly what "usable" means there.
Step 2 — Usage: what the character is for, and the running total
The second screen asks "What do you want to do with this character?" and shows usage cards you can multi-select. The SFW card covers lifestyle photography — café shots, walks, dressed everyday scenes. The VOICE card adds a voice so the character can speak. Each card carries a price tag in its corner, and the Continue button in the bottom right shows the running total for everything you have ticked.
A note under the heading tells you that you can add new usages later from your character page, and this is true and worth acting on. Ticking VOICE now is not cheaper than adding it later, and it lengthens the funnel before you have even seen the face. If you are unsure, leave it off. You cannot continue with nothing selected.
The other thing this screen does is check your balance before you spend anything. If the total for your selection exceeds your credits, a red panel appears telling you exactly how many credits the build requires, how many you hold, and how many are missing, with a Buy credits button — and Continue is disabled until you top up. This gate exists for a reason: the money spent on the earlier steps is not refunded if you stall at the final confirm. Clearing the gate up front is the intended way through.
Step 3 — Portrait: the form, or your own description
The Portrait step opens with a heading that reads "Create your character from scratch" and a choice of two input modes sitting side by side. "Describe with form" gives you the structured builder. "Write a prompt" gives you a free-text box, up to 2000 characters, where you describe the character in your own words and anything you leave out is filled in for you. They are mutually exclusive — pick one.
On the form path, the fields in order are: Character name, Apparent age (a slider from 18 to 50), Origin / ethnicity, Skin type, Perceived nationality, Eye color, Hair color, Hair type, Haircut / length, and Face features. Most of these are picture grids rather than dropdowns, so you are choosing a look rather than reading a word. Body proportions are deliberately absent here — they are asked on the Body step instead, so they are not asked twice.
A counter above the Generate button reads "x/5 essential fields filled". The five it counts are name, origin, eye color, hair color and haircut. You can technically generate with fewer traits set, but the generator then fills the gaps for you, and the gaps are where drift comes from — a character with only three traits pinned will look meaningfully different between one batch and the next. Filling all five is a two-minute investment that pays for itself.
The Generate button carries a 6 cr tag. That buys one batch of two face candidates. Every subsequent batch costs the same 6 credits.
Step 4 — Pick: choosing between two faces
The Pick screen says "We generated two proposals from your choices. Pick the one you like." Two cards appear side by side, each spinning until its image lands. Tapping one selects it, and a name field appears underneath pre-filled with the name you entered on the form.
Under the two candidates sit the retry controls. "Regenerate (6 cr)" runs the same prompt again for two fresh faces. If you took the free-text route on the previous step, a second button appears — a feedback regeneration, where you describe what is wrong with the current images in your own words and the prompt is revised before the next attempt. That one also costs 6 credits, but it is the better use of them: a plain regeneration rolls the dice again on the same instructions, while the feedback path actually changes them.
Be disciplined here. Two or three batches is normal. Six batches is 36 credits spent on a face you are still not happy with, and at that point the fix is to go back and change the form, not to keep rolling. The "Edit form" button in the bottom left takes you back with everything preserved.
Pressing "Confirm my character" on this screen does not create the character. It commits the face you picked and moves you to the Body step. Nothing is charged by this transition.
Step 5 — Body: the two shots that anchor everything else
The Body step is headed "Body shots" and does two jobs. First it collects the physical traits that were held back from the Portrait form — Body shape, Hip/rear shape, Chest shape, and Haircut / length again — as picture grids. Then it generates a front and a back full-body shot of your chosen face with those proportions.
If nothing has been generated yet, a single "Generate front + back" button runs both at once for 6 credits. Once shots exist, each side gets its own "Regen (3 cr)" button in its panel header, so you can re-roll a bad back view without paying to redo a front view you were happy with. Every regeneration is kept as a small thumbnail under its panel, and you can click back to an earlier one — you are never forced to accept the most recent attempt.
When both sides are ready, the name field appears and the final "Confirm my character" button becomes active with a 38 cr tag. This is the real one. Pressing it creates the character, charges the 38 credits, and starts the build: seven lifestyle photographs are generated automatically from your three reference shots, and those seven plus the three anchors — face, front, back — become the training set the character model learns from.
A line under the button tells you the character trains for around 15 minutes and that you will be emailed when it is ready. You do not have to sit on the page. The character appears on your characters list immediately and is already usable for video from the three reference shots; the trained model arrives when training completes.
Step 6 — Voice, if you asked for it
If VOICE was ticked back at Usage, the builder lands on a Voice step after the character is created, headed "Add Voice" with your character's name underneath. Three cards offer three ways to get a voice, at three different prices. You can also leave — "Skip voice setup" exits without a voice, and the character is already fully created either way.
The next-but-one lesson covers this step properly, including which of the three methods is worth paying for and the condition under which your first voice is free. If you did not tick VOICE, the builder simply returns you to your characters list and you are done.
The from-scratch build, end to end
Six screens, three charge points, roughly twenty minutes of your attention plus fifteen of training. Credit figures are what the buttons display.
- Choose your method — On the first screen, pick "Create from scratch". This sets your route to Portrait then Body. Free.
- Declare the usage and clear the credit gate — Tick the SFW usage card, and VOICE only if you are certain you want it now. Read the total on the Continue button. If a red insufficient-credits panel appears, top up before continuing — the gate is protecting you from stalling mid-build. Free.
- Fill the Portrait form — Choose "Describe with form" and complete all five essential fields — name, origin, eye color, hair color, haircut — plus skin, nationality, hair type and face features. Watch the x/5 counter reach 5 before you generate. Free until you press Generate.
- Generate two face candidates — Press Generate. Two proposals render. 6 credits.
- Pick a face, or revise — Tap the better candidate. If neither works, use Regenerate for another pair, or — on the free-text route — the feedback regeneration, which revises the instructions instead of just re-rolling them. 6 credits per additional batch. Then press "Confirm my character" to move on, which is free.
- Set body traits and generate front and back — Choose body shape, hip/rear shape and chest shape, then press "Generate front + back". Re-roll either side individually at 3 credits if needed. 6 credits for the pair.
- Confirm and let it train — Name the character and press "Confirm my character" with the 38 cr tag. Seven lifestyle photos generate automatically and join your three anchors as the training set. Training takes about 15 minutes and you are emailed when it finishes. 38 credits.
- Add a voice, or skip — If you ticked VOICE, choose one of the three methods on the Voice step, or press "Skip voice setup". The character exists either way. Cost depends on the method.
Where the credits actually go on a from-scratch build
- Method and Usage steps: free — nothing is charged until you press Generate on the Portrait step
- Two face candidates: 6 credits per batch, charged again on every regeneration
- Front and back body shots: 6 credits for the pair, 3 credits to re-roll one side
- Final confirm: 38 credits — covers the seven automatic lifestyle photos plus training
- Minimum clean run, no retries: 50 credits
- Voice, if you add it: 5, 8 or 10 credits depending on the method
Frequently asked questions
- How many credits does one character cost from start to finish?
- Fifty credits for a clean from-scratch run with no retries: 6 for the pair of face candidates, 6 for the front and back body shots, and 38 at the final confirm, which covers the seven automatically generated lifestyle photos and the training itself. Retries are the variable. Each extra batch of face candidates is another 6 credits, and re-rolling a single body shot is 3. A build where you regenerated faces twice and redid the back view lands at 65 rather than 50. Voice is separate and optional at 5, 8 or 10 credits depending on the method you choose. If you are on a Pro, Business or Agency plan and this is your very first character, the from-scratch build is waived entirely — check your balance after the confirm rather than assuming, since the waiver only ever applies once.
- What happens if I close the tab halfway through the builder?
- Nothing is lost. The builder saves your draft server-side after every step — the method you picked, the usages you ticked, every trait on the form, and the images already generated. Reopen your characters page and the unfinished draft is sitting there as a card you can resume, landing you back on the step you left. Drafts are kept for 30 days before they are cleaned up. What you should not assume is that credits already spent come back: if you generated face candidates and then abandoned the draft, those 6 credits are gone, because the images were produced. This is the practical reason the Usage step blocks you when your balance is short. It would rather stop you at zero spend than let you burn 12 credits on faces and body shots and then hit a wall at the 38-credit confirm.
- Can I change my character's traits after it is created?
- The traits you set in the builder are baked into the trained model, so no — you cannot go back and change the eye color of a character that has already trained. What you can change afterwards is what the character is used for. The note on the Usage step is accurate: new usages can be added later from the character page, so a character built for lifestyle photography can gain a voice weeks later without rebuilding anything. If you genuinely need a different look, build a second character. That is the intended pattern, and it is why the builder is deliberately cheap at the top and expensive only at the confirm — experimenting with faces costs 6 credits a go, and you only pay the 38 once you are sure.
- Why does the builder generate photos automatically at the end?
- Because a model trained on three images is not stable enough to be useful. When you press the final confirm, seven lifestyle photographs are generated from your three reference shots — face, front and back — giving a training set of roughly ten images that covers varied angles, lighting and settings rather than three near-identical studio poses. That variety is what lets the trained character hold together across hundreds of later generations instead of drifting whenever you ask for an unusual angle. It is also why the confirm is the expensive step: 21 of those 38 credits are the seven photos, and the remaining 17 is the training run. You do not choose the seven scenes and you do not need to — they are a fixed set chosen to cover the range a model needs.
Related reading
Build your first character
Fifty credits, six screens, about fifteen minutes of training. Open the builder, choose Create from scratch, and you will have a character that holds its look and body across every photo you generate afterwards.
Start free